Next.js 13 Route Handlers with Typescript
Learn how API routing works in Next.js 13 with GET, POST, PUT and DELETE requests.

Experienced engineer with a strong background in data science, machine learning and web development. My current expertise revolves around Generative AI and multi-modal AI (Language & Vision). I am passionate about writing clean, maintainable, and scalable code that facilitates easy collaboration. I am also heavy on AI Research.
Next.js, the popular React framework, recently released Version 13 with several exciting features and improvements. One of the key changes in this version is how API routing is handled. For newcomers and developers transitioning from Version 12, this shift might seem challenging at first.
However, fear not! In this article, we'll dive deep into the new API routing approach in Next.js 13, empowering you to effortlessly create powerful APIs in your applications. Whether you are starting a new app or transitioning versions, this article has the answers you seek.
Understanding the Transition
Let's briefly compare the API routing in Version 12 and Version 13. In Next.js Version 12, we used the /pages/api directory to define our API routes. Each file within this directory represented an API endpoint. However, Version 13 introduces a more modular approach by using the /api/routeName convention.
Setting up Next.js Version 13
To get started, ensure you have Next.js Version 13 installed globally on your machine. You can achieve this by running the following command:
npm install -g next@latest
Once the installation is complete, create a new Next.js project using:
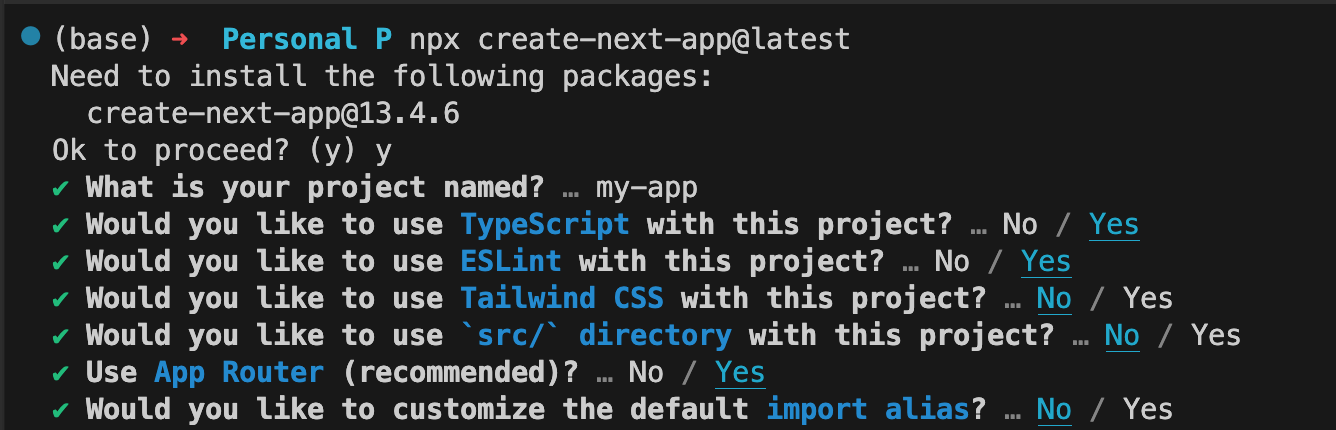
npx create-next-app@latest
Respond to the prompts accordingly, using your arrow keys to switch between the options and the enter key to select. Below are my responses:
Creating API Routes
In Next.js Version 13, we'll define our API routes within the /api directory. Unlike before, we're no longer restricted to a single /pages/api directory, allowing for a more organized project structure.
To create an API endpoint, follow these steps:
Create a new folder named
apiin yourappdirectory, if it doesn't exist.Inside the
apifolder, create another folder with the name of your API endpoint. For example,hello. Then create aroute.tsfile. The file path should look like this/app/api/hello/route.ts.In
route.ts, create two functions for theGETandPOSTrequests.
import { NextResponse, NextRequest } from 'next/server';

export const GET = async () => {
  return NextResponse.json({ message: 'Hello, Next.js Version 13!' }, { status: 200 });
};

export const POST = async (request: NextRequest) => {
  const body = await request.json();
  console.log({ body });

  // Do something

  return NextResponse.json({ message: 'Operation successful' }, { status: 200 });
};
And that's it! When you call /api/hello with a GET method, you will get a response with the message "Hello, Next.js Version 13!". Whereas, the POST method will return a response with the "Operation successful" or whatever you specify. Other HTTP methods like PUT and DELETE can also be implemented similary.
NOTE: NextResponse and NextRequest should be imported from the next/server package, not next like in version 12. Also, the request body is gotten by calling the request.json method.
Accessing API Endpoints
Now that you have your API endpoint set up, let's see how we can access it from any component within your Next.js application.
In any of your application's components, you can use the fetch API or any HTTP client library to make a request to your API endpoint. We would use the POST request in the example below, for the homepage of our application. Copy the code into the pages.tsx file.
'use client';

import { ChangeEvent, useState } from 'react';
import styles from './page.module.css';

const Home = () => {
  const [email, setEmail] = useState('');

  const handleSubmit = async (e: ChangeEvent<HTMLFormElement>) => {
    e.preventDefault();
    try {
      const response = await fetch('/api/hello', {
        method: 'POST',
        headers: {
          'Content-Type': 'application/json',
        },
        body: JSON.stringify({ email }),
      });
      const { message } = await response.json();
      alert(message);
    } catch (error) {
      console.error(error);
    }
  };

  return (
    <main className={styles.main}>
      <form onSubmit={handleSubmit}>
        <input
          type='email'
          name='email'
          placeholder='Enter email'
          value={email}
          onChange={(e) => setEmail(e.target.value)}
          required
        />
        <button type='submit'>Submit</button>
      </form>
    </main>
  );
};

export default Home;
Notice that we're making a POST request to our /api/hello endpoint with the request body containing the message from the input element. We also converted the component to a client component by adding 'use client' at the top of the file.
Voilà! Isn't that amazing? Now you can run your Next.js app and test it.
Conclusion
In this article, we explored how to create API routes in Next.js Version 13, step by step, and demonstrated how to access those endpoints from within your application. Armed with this knowledge, you'll be well-equipped to embrace the exciting new features of Next.js Version 13 and build amazing applications with ease. To learn more about route handlers, visit the Next.js official documentation.
Happy coding!
Thank you for reading till the very end. I value your feedback and would love you to drop them in the comments. Connect with me on YouTube, LinkedIn, and GitHub @ uniqcoda. Check out my YouTube channel for more front-end development content.


